
How to winterize an RV comes down to getting every drop of water out of the plumbing before it freezes, because water expands as it turns to ice, and a split fitting behind a wall is an expensive thing to find in April. Plan on an afternoon and one wrench. What matters is the order, not the products: bypass the water heater before the antifreeze goes in, or you will fill a ten-gallon tank you spend spring flushing out.
Table of Contents
Quick answer
Drain everything, bypass the water heater, then either push RV antifreeze through the lines or blow them out with compressed air. Antifreeze is more forgiving and costs a few gallons. Compressed air is cleaner and costs nothing, but the pressure limit is where the manufacturers stop agreeing with each other, so use the number in your own manual.
Which method, antifreeze or compressed air?
How to winterize an RV comes down to one choice before anything else, and both options work. The difference is what happens when you get it slightly wrong.
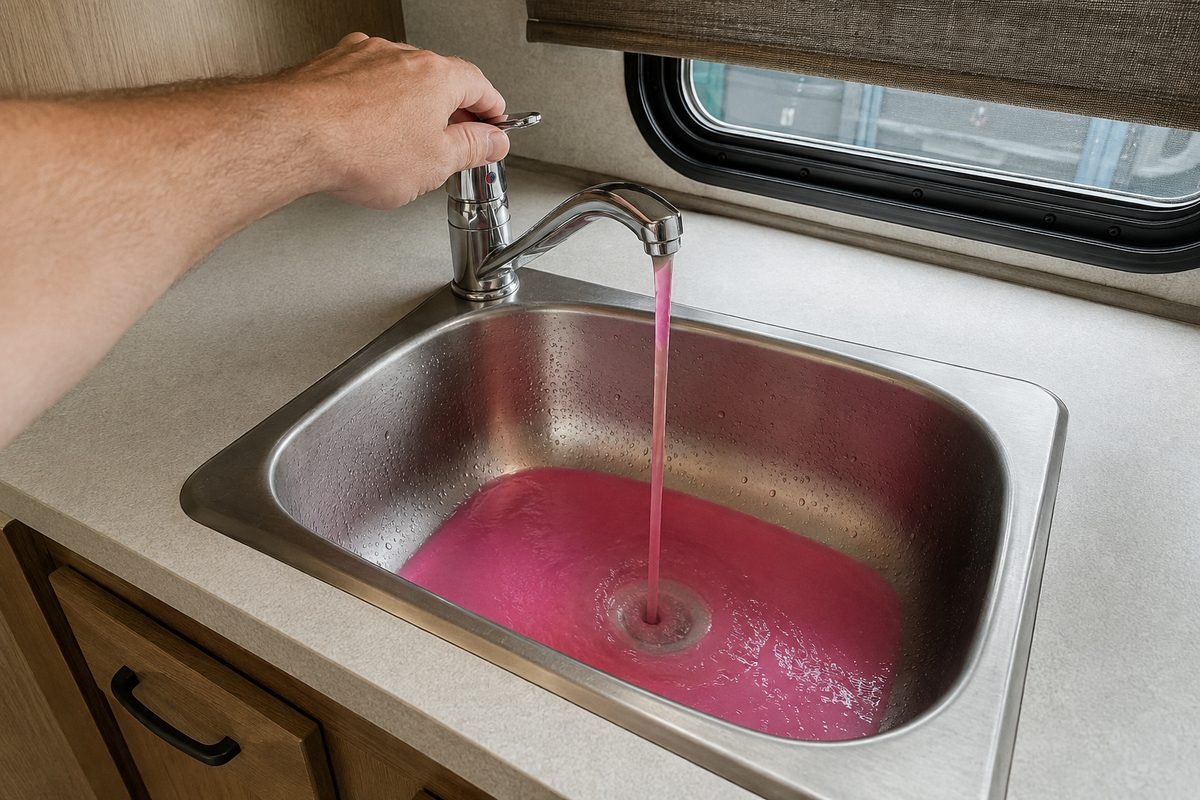
Antifreeze fills the lines with a liquid that won't burst them, so a low point you forgot still has something in it protecting the pipe. It costs a few gallons, and it leaves pink antifreeze sitting in the lines all winter. In spring, you run every faucet until the water comes out clear again before you use it.
Compressed air leaves the system dry and empty, with nothing to flush and nothing to buy. It's less forgiving, because a trap or a low spot that still holds water has nothing protecting it, and you can't see inside the pipe to check.
Plenty of people do both, blowing the lines out first and then pumping antifreeze through. The air clears most of the water, and the antifreeze protects whatever the air missed, so a low spot you never found is covered either way. It costs about an extra hour. If you're doing this for the first time, the antifreeze method is the one that forgives a missed step.
The pressure question, and where the manufacturers disagree
If you use compressed air, the one number that matters is how hard you push it, because too much pressure splits the fittings you're trying to protect. This is where the published guidance stops agreeing.
Keystone's own instructions say to "be sure not to exceed 30 PSI air pressure." Winnebago says you will "only be blowing out your lines at 35-50 psi," and that "any higher may damage your plumbing." Jayco's guide walks the whole procedure and never gives a figure at all, saying only that remaining water will blow out in five to ten minutes.
So Winnebago's floor sits above Keystone's ceiling. Both are manufacturers publishing instructions for their own trailers, and neither explains the reasoning behind its number. None of the guides we checked accounts for the gap.
What follows is simple enough. Use the figure in your own manufacturer's literature, and if you can't find one, the lower number is the one that can't hurt you. Nothing is lost by blowing the lines out at 30 PSI for a few extra minutes. Something is lost by finding out your fittings were rated closer to Keystone's number than Winnebago's.
The steps, in the order they go
Turn the water heater off and let it cool
This is first because it has to happen before anything else can. A water heater tank holds six or ten gallons, and it holds them hot. Jayco's instructions are specific that both switches come off, not one: "make sure the water heater 12-volt and 120-volt interior control switches are OFF."
Then leave it alone until it's cold. Draining a hot tank is how people scald themselves, and no part of this job is urgent.
Drain the fresh water tank and the low point drains
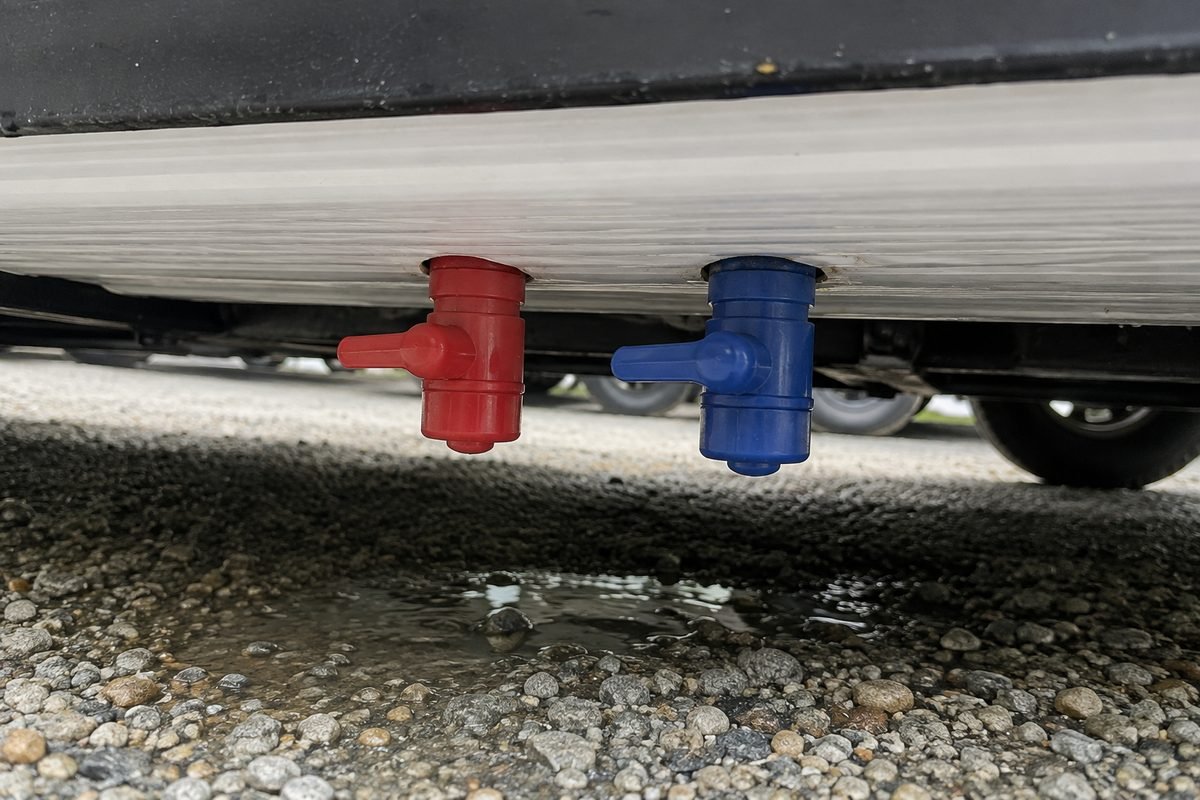
Open the fresh tank drain and let it empty. Then find the low-point drains: the two capped pipe ends hanging below the floor, usually near the middle of the trailer, one for hot and one for cold. Open both and leave them open while the rest drains.
Open every faucet in the RV while this happens, hot and cold sides both, including the shower, the outside shower if you have one, and the toilet valve. Air has to get in for water to get out.
Drain the water heater itself
With the tank cold, remove the drain plug and open the pressure relief valve on the side of the tank. The relief valve is what lets air in so the tank empties rather than gurgling.
One thing worth knowing before you put a wrench on that plug. On many RVs, the drain plug is the anode rod, a sacrificial part that protects a steel tank, and on an aluminum tank there may be no anode at all. Which one you have decides whether that plug is a consumable you replace or a fitting you reuse. Our water heater guide covers how to tell aluminum from steel before you touch anything.
Everything else about a water heater belongs to a technician. The burner, the flue, the vent, and the propane supply are a combustion system, and nothing in winterizing requires you to open any of it. Turn it off, let it cool, drain the water side, and leave the rest alone.
Bypass the water heater
This is the step people skip and regret. The bypass valves route antifreeze around the water heater instead of through it. Without them, you will fill a ten-gallon tank with antifreeze you didn't need to buy, and then flush it out in spring.
Jayco's wording is to "turn the water heater bypass valves to the BYPASS position." The valves live behind or beside the heater, usually reachable from an inside cabinet. Older RVs may have three. Newer ones often have one.
Push the antifreeze through, or blow the lines out
For the antifreeze method, close the low point drains and the fresh tank drain first. Jayco notes that on its motorized products "the low point drains must be closed for the antifreeze to siphon through the lines." Put the pump's siphon tube into a jug of RV antifreeze, run the pump, and open one fixture at a time until pink comes out. Work from the fixture nearest the pump to the furthest.
For the compressed air method, screw a blow-out plug into the city water inlet. That is the small fitting with a tire valve on it, and it goes where the hose from the campground post normally connects. Set the compressor to the figure in your own manufacturer's literature. If you can't find one, stay at 30 PSI, the lowest of the published figures and the one that can't split a fitting. Then open one fixture at a time, working from the nearest to the furthest, until only air comes out.
Leave the water heater out of this. You drained it and bypassed it two steps ago, and the bypass exists so that nothing gets pushed through the tank.
Do the drains and the traps
Pour a cup or so of RV antifreeze down every drain, which means both sinks, the shower, and the toilet. Those P-traps hold standing water by design, and they sit outside everything you just did to the supply lines. A cracked trap is a cheap part and a miserable afternoon.
Should you winterize the water heater or just drain it?
Drain it and bypass it. Those are two jobs, not one, and doing only the first is the common mistake.
Draining empties the tank. Bypassing keeps antifreeze out of it. If you drain but don't bypass, the tank refills with antifreeze the moment you run the pump, which wastes several gallons and leaves you a tank to flush in spring. If you bypass but don't drain, you have left six to ten gallons of water sitting in a tank through a freeze.
Can you just put RV antifreeze in the freshwater tank?
You can, and it's the method that wastes the most antifreeze for the least protection. Filling a forty-gallon fresh tank to push antifreeze through the lines means buying forty gallons of it, and flushing all of it out in spring before the water is drinkable again.
The siphon tube on the water pump exists precisely so you don't have to. It draws straight from the jug, which is why two or three gallons covers most RVs rather than a tankful.
How many gallons of RV antifreeze do you need?
Somewhere around two to three gallons for a typical travel trailer using the pump and siphon method, more if the RV is long or has a washing machine, an ice maker, or a second bathroom.
Here is where that figure comes from. None of the three manufacturer guides we checked publish a quantity. Keystone, Winnebago, and Jayco all describe the procedure, and none of them tells you how much to buy. Two to three gallons is what the RV trade generally quotes, not something a manufacturer stands behind, so buy a spare jug.
Use the right antifreeze, and this one matters
RV antifreeze is propylene glycol, and it's meant to go inside a drinking water system. Automotive antifreeze is usually ethylene glycol, and it must never go near one.
This isn't a preference. The ATSDR profile for ethylene glycol states that when it breaks down in the body it "forms chemicals that crystallize, and the crystals can collect in your kidneys and can affect kidney function," and that it "forms acidic chemicals in the body, which can change the body's acid/base balance and affect your nervous system, lungs, and heart." It also notes why it gets swallowed at all: "antifreeze is a sweet-tasting, brightly colored liquid."
Both kinds are pink. Read the jug, and keep automotive antifreeze out of the trailer entirely so the question can't come up on a cold afternoon.
Do you leave the faucets open afterward?
If you blew the lines out with air, yes. Leaving the faucets and the low point drains open gives any water you missed somewhere to go, and there's nothing in the lines to leak out.
If you filled the system with antifreeze, close them. The antifreeze is doing the work, and there's no reason to let it drain away over a winter.
What winterizing does not protect
This is the part most guides leave out, and it's where the spring damage comes from. A correctly winterized trailer is well protected. RV antifreeze is rated to roughly fifty degrees below zero, colder than almost anywhere sees. The plumbing is usually fine.
The battery isn't. A discharged lead-acid battery can freeze not far below freezing point, while a fully charged one is safe far colder. A battery left on a slow parasitic drain for five months arrives at spring flat, and then freezes on the first hard night. Battery maintainers cover keeping it alive, and taking it out to somewhere dry works just as well.
Damp isn't protected either. Nothing you do to the plumbing affects condensation, and a sealed trailer with no airflow grows mold on its own schedule. Moisture absorbers and dehumidifiers cover what works with no power available.
Mice aren't kept out either. A winterized trailer is exactly as attractive to a rodent as one that isn't. Keeping mice out is a separate afternoon, and mice are the ones that chew wiring.
The outside isn't. Five months of sun, rain and freeze-thaw work on the roof, the seals and the tires whether the plumbing is empty or not. RV covers for winter storage covers what a cover fixes, what it doesn't, and the one rule that turns a cover into a mold problem. If the trailer sits uncovered, RV tire covers at least keep the sun off the tires.
Winterizing also does nothing for the slide rooms. Lippert recommends the rooms be closed for long term storage, and a room brought in wet traps water against the seal and the wall behind it. RV slide out types covers which mechanism is under your RV, what the seals need, and how to move a room by hand if the power fails.
And none of it tells you when something has gone wrong. A missed low point drain or a trapped pocket still splits a line, and in an unattended storage lot you find out in April. Freeze alarms and temperature sensors cover what will reach you from a lot with no wifi.
What to buy
The two that do the actual work. RV antifreeze, propylene glycol, two or three gallons for a typical trailer plus a spare. Buy this one locally rather than online. A hardware store or farm supply sells it by the gallon cheaply in season, while shipping a heavy jug can triple or quadruple the cost of the same gallon, and a lot of what comes up in an online search is boiler fluid or raw glycol concentrate rather than the ready-to-use RV kind.
Read the jug and put it back if it doesn't say propylene glycol. A water pump conversion kit or siphon tube if your pump doesn't already have one, which is the part that lets you draw from the jug rather than filling the fresh tank. The Camco 36543 pump converter kit is the common one: a brass three-way valve and a siphon tube that stay installed year-round, so next winter is just a lever and a jug.
Worth having. A blow-out plug for the city water inlet if you're using compressed air, which is inexpensive and screws on like a hose fitting. Camco's brass 36153 takes a standard tire inflator fitting, so any compressor you already own will drive it. A socket or wrench that fits your water heater drain plug, checked against the plug before the day you need it.
Skip. All-in-one winterizing kits priced above the sum of their parts, and any antifreeze that doesn't say propylene glycol on the jug. Skip heated tank pads and pipe heaters as a winterizing solution too, because they need continuous power and a stored trailer usually has none.
What it comes down to
How to winterize an RV is a short list done in the right order. Water heater off and cold, everything drained, heater bypassed, lines either filled or blown out, antifreeze down the traps. The plumbing is the easy part, and the published guidance mostly agrees with itself.
The two things worth carrying away are that the pressure limits conflict between manufacturers, so follow your own, and that the plumbing was never the whole job. The battery, the damp, and the mice are all still waiting.
Quick Answers
Should you winterize the water heater or just drain it?
Drain it and bypass it. Those are two jobs, not one. If you drain but don't bypass, the tank refills with antifreeze the moment you run the pump. If you bypass but don't drain, six to ten gallons of water sit in a tank through a freeze.
Can you just put RV antifreeze in the freshwater tank?
You can, and it wastes the most antifreeze for the least protection. Filling a forty-gallon fresh tank means buying forty gallons and flushing all of it out in spring. The siphon tube on the water pump exists so you don't have to.
How many gallons of RV antifreeze do you need?
Around two to three gallons for a typical travel trailer using the pump and siphon method, more for a long RV or one with a washing machine or second bathroom. None of the three manufacturer guides we checked publish a quantity.
What air pressure should you use to blow out RV water lines?
The manufacturers disagree. Keystone says not to exceed 30 PSI. Winnebago says 35 to 50 PSI and that any higher may damage plumbing. Jayco publishes no figure. Use your own manufacturer's number, and if there's none, the lower figure can't hurt you.
Do you leave the faucets open after winterizing?
If you blew the lines out with air, yes, and leave the low-point drains open too. If you filled the system with antifreeze, close them, because the antifreeze is doing the work.
Can you use automotive antifreeze in an RV?
No. RV antifreeze is propylene glycol. Automotive antifreeze is usually ethylene glycol, which ATSDR states forms crystals that collect in the kidneys and acidic chemicals that affect the nervous system, lungs, and heart. Both kinds are pink, so read the jug.
For more on storing and winterizing an RV, see our other Storage and Winterizing guides.