
An RV slide out is the single most complicated moving assembly on the vehicle, and most owners don't know which kind is bolted under theirs. That matters, because the four common RV slide out types fail differently, are recovered differently when the power dies, and one of them is damaged by the maintenance that owner forums recommend for all of them.
This is a guide to telling them apart, and to what each manufacturer says about looking after the one you own. Knowing the RV slide out types on your own trailer tells you what to lubricate and what to leave alone.
Table of Contents
Why Does the Type of Slide Out Matter?
Three reasons, and none of them show up until something goes wrong.
The first is recovery. Every system has a way to bring the room in without power, and the four methods have nothing in common. One needs a crank handle, one needs a cordless drill, one needs a flexible shaft, and one needs a synchronization routine before it will move at all. Learning which applies in a storm, in the dark, with a room stuck out, is the wrong time.
The second is maintenance. The advice that circulates on forums is to spray the mechanism. For three of the four RV slide out types, the manufacturer says the opposite in writing.
The third is diagnosis. A room that stalls halfway means a different thing on each system, and describing the symptom to a service center is far easier when the words match the hardware.
What Are the Four RV Slide Out Types?
Four mechanisms cover almost everything built in the last twenty years. The table sets them side by side, and the sections after it take each one in turn.
| In-wall (Schwintek) | Rack and pinion (electric) | Hydraulic | Cable (Accu-Slide) | |
|---|---|---|---|---|
| What moves it | Two motors driving vertical gear racks in the side walls | Electric motor turning a ball screw actuator | Hydraulic cylinder fed by a pump | Motor winding cables over sprockets |
| Where to look | Vertical toothed columns on both sides of the opening | Steel tube through the frame under the floor | Ram and hose under the floor, pump in a bay | Cables and pulleys at the room corners |
| Typical rooms | Lighter rooms, bedrooms, wardrobe slides | Mid weight rooms in trailers | Heavy rooms, fifth wheels, big living slides | Lighter rooms, many Forest River trailers |
| Manual override | Sync procedure, then service | Crank handle or socket on the actuator | Hex bit and a drill on the pump | Flexible shaft on a quarter inch hex |
| Lubrication | None. The manual says so plainly | None. The manual says so plainly | None on the mechanism. ATF in the pump | Pulleys only, and only if they squeak |
| Owner adjustable | No | No | No | Yes, cable tension is a published spec |
How Does an In-Wall Slide Out Work?
Lippert calls this the In-Wall system and everybody else calls it Schwintek. It's the easiest one to recognize, because the working parts aren't hidden. Look at the side walls of the slide opening and you will see a toothed vertical column running top to bottom on each side.
There's a motor at each side. The manual lists the parts as a spur gear, a gear rack, a torque shaft and an H column. Both motors have to travel the same distance at the same time, and when they don't, the room racks over and jams in the opening.
That is why this system has a procedure no other slide out has. Lippert publishes it plainly: "Fully extend the slide room using the switch. Keep the switch engaged until the motors shut down on their own. Retract the room 1-2 inches. Repeat steps 1 and 2 until both motors shut down at the same time." The manual adds that "in many cases, two or three repetitions are necessary to re-sync the system."
If a Schwintek room ever looks crooked in its opening, that routine is the first thing to try, and it's free.
How Does a Rack and Pinion Slide Out Work?
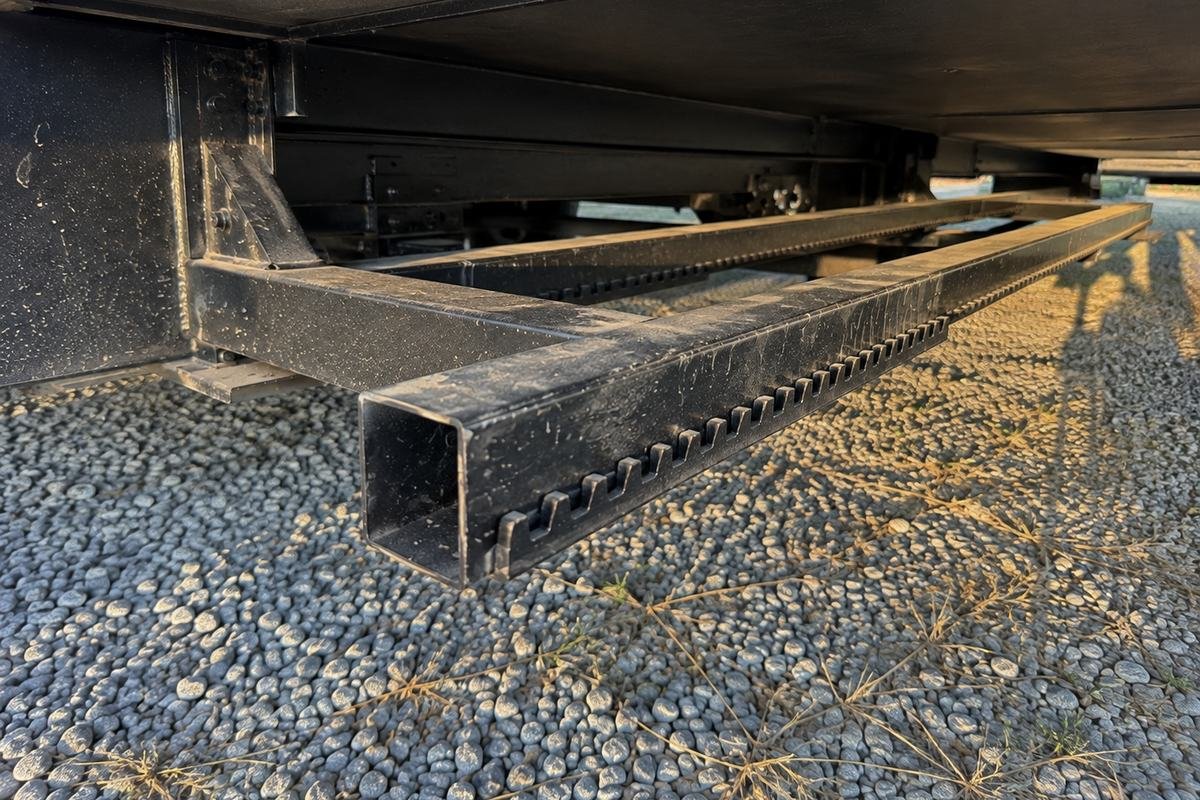
This is the through frame system, and the giveaway is underneath rather than beside. Lie down at the side of the RV and look under the slide room. A rack and pinion slide runs on steel tubes that pass through the frame, with a toothed rack along them.
Lippert describes the electric version as "a rack and pinion guide system, utilizing an electric ball screw actuator to move the room assembly", with the motor driving "the ball screw in a forward and backward motion to move the slide room in and out". One motor, one actuator, and the rack and pinion keeping the room square rather than driving it.
The manual override is mechanical and it's simple. From outside the frame, a crank handle turns "clockwise to retract and counterclockwise to extend". From inside the frame, a socket and ratchet does the same job.
One warning in that manual is worth repeating, because getting it wrong is expensive. "Always disconnect battery from system prior to manually operating system. Failure to disconnect battery can cause electricity to backfeed through the motor and cause serious damage to the system." Lippert also notes that running the room past its maximum travel in either direction risks stripping gears.
How Does a Hydraulic Slide Out Work?
Hydraulic slides are used for the heaviest rooms. They turn up on fifth wheels and on the large living room slides that carry a sofa and a fireplace. The mechanism is the same guide arrangement as the electric version, with a hydraulic cylinder doing the work instead of a motor. Lippert calls it "a rack-and-pinion guide system, utilizing a hydraulic cylinder to move the room assembly".
Under the floor there's a ram and a pair of hoses. Somewhere in a bay there's a pump with a reservoir, and it's usually shared with the leveling jacks. The standard reservoir holds about two quarts.
The fluid is the one consumable on any slide out system, and Lippert is specific about it. "Type 'A' Automatic Transmission Fluid (ATF) is utilized and will work. ATF with Dexron III® or Mercon 5® or a blend of both is recommended." Not hydraulic oil, and not whatever is on the shelf.
Recovery is done with a drill. "Using a standard hex bit and auxiliary drive device (cordless or electric drill), insert hex bit into coupler found under protective label", then run it "counterclockwise to extend slide-out room and clockwise to retract". Lippert puts a figure on it: a standard 38 inch room takes about 45 seconds to bring in that way.
How Does a Cable Slide Out Work?
The cable system is made by BAL and sold as Accu-Slide, and it turns up on a lot of Forest River trailers. Instead of pushing the room, it pulls it, with cables running over pulleys at the corners of the opening and a motor winding them.
The service manual describes corner pulleys and jamb pulleys guiding the cables, cables terminating at standoff brackets on the room framework, and tension set by adjustment nuts at the cable and chain connectors.
This is the one system with a published figure an owner can check against. "When the room is seated full out, the OUTSIDE cables should be slack enough to move the cable approximately ½" up or down (1" total movement) by hand." The same tolerance applies to the inside cables with the room seated full in. If a cable slide is dragging on one corner or leaving a gap at the top, that measurement is where the diagnosis starts.
Manual recovery uses a flexible shaft on a quarter inch hex fitting at the end of the motor.
How Do You Tell Which One You Have?
A quick look with a flashlight answers it in almost every case.
Open the room and look at the vertical sides of the opening. Toothed columns running up both sides means in-wall, and no other system looks like that. If the sides are bare, go outside and look underneath the extended room. Steel tubes running back through the frame with a toothed rack along them means rack and pinion, and the question is then whether the thing moving them is an electric actuator or a hydraulic ram with two hoses. Cables and pulleys visible at the corners of the opening mean an Accu-Slide.
The other clue is the sound. Hydraulic rooms are quiet and there's a pump running somewhere else in the RV. Electric rooms make their noise at the room itself, where the motor is.
Should You Lubricate an RV Slide Out?
This is where owner forums and the manufacturer disagree, and it's the most useful thing on this page.
Lippert says no. Not as a footnote, and not for one system only. The In-Wall manual states that "no grease or lubrication is necessary, and in some situations may be detrimental to the long-term dependability of the system." The electric through frame manual says the same thing in almost the same words, and so does the hydraulic one.
What all three ask for instead is cleaning. The In-Wall manual asks that in harsh conditions "the gear racks and seals be kept clean and free of debris", washed "with mild soap and water". Grease on an exposed vertical gear rack is a magnet for grit, and grit on a gear rack is an abrasive paste.
The cable system is the one exception, and it's a narrow one. Its manual mentions lubrication once, for a specific symptom: lubricate the corner pulleys if the room squeaks.
There's one thing all the electric and hydraulic manuals do ask for, and it costs nothing. "Actuate the room once or twice a month to keep the seals and internal moving parts lubricated." A slide out that sits still for a season is worse off than one that gets used.
What Needs Maintaining?
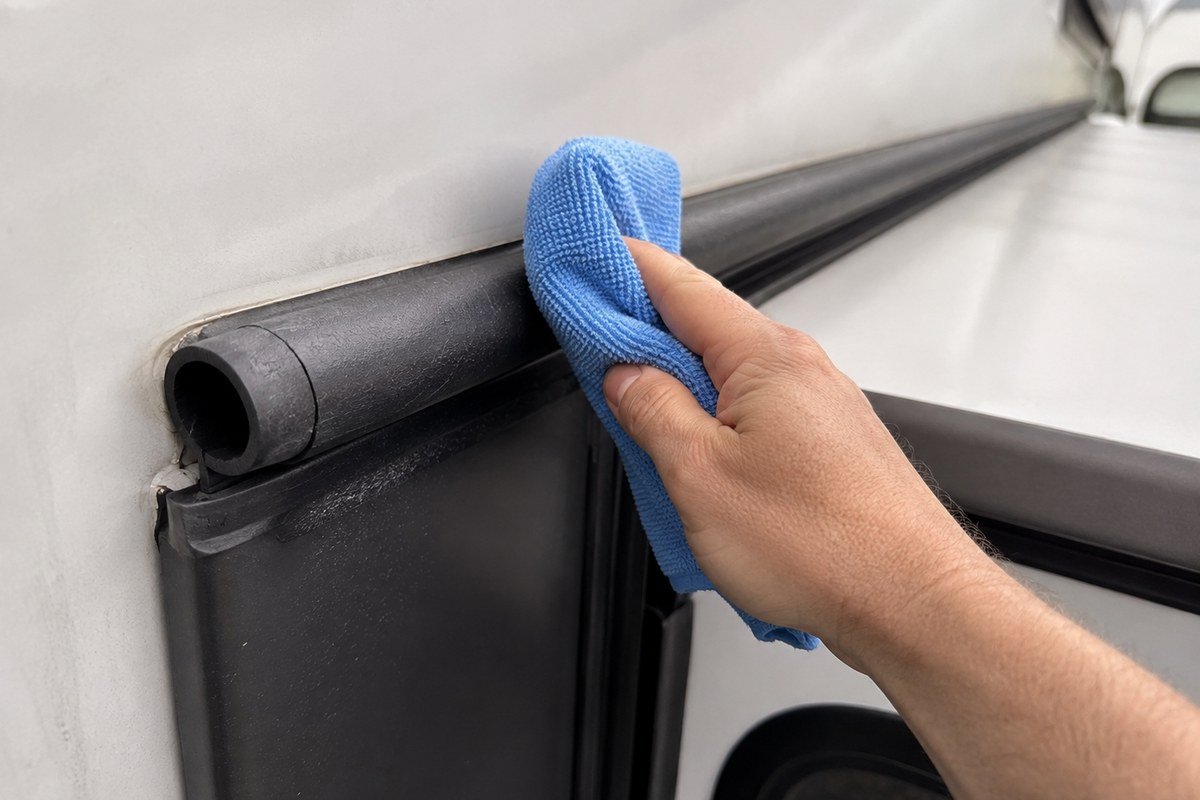
The rubber. The mechanism is designed to be left alone, but the seals around the room are consumable, and they're what keeps water out of the wall. Bulb seals and wiper seals dry out, harden, crack at the corners and then stop sealing when the room is brought in wet.
A rubber seal conditioner is the one product this article recommends buying, and it's worth doing twice a year on the seals of every slide, plus the door and window seals while the bottle is open. Two are worth knowing about, and the difference between them is mostly the applicator and the size.
3-IN-ONE RVcare Rubber Seal Conditioner
The low cost pickEleven ounces with a two way straw, which helps when the target is the underside of a bulb seal on a room that's already extended. The straw reaches the corners without running the slide in and out to get at them.
The maker states UV inhibitors to slow cracking and fading, a water resistant film, and use on window, door, compartment and hatch seals as well as the slide. It also has by far the deepest review history in this category, at close to seven thousand ratings.
What You'll Love
- Two way straw reaches the underside and the corners of a bulb seal
- UV inhibitors, which is the failure mode that kills seals
- Does the door, window and hatch seals from the same can
- Low enough in price that the job doesn't get put off
Worth Considering
- Eleven ounces doesn't go far on an RV with three slides
- Spray application means overspray on the wall below
- Needs redoing twice a year, so it's a habit rather than a fix
- Won't restore a seal that has already split
Star Brite Premium RV Rubber Seal Conditioner
For an RV with several slidesThe same job in a larger and more expensive package, from a marine brand that has made rubber and vinyl care products for decades. If the smaller can runs dry halfway round the trailer, this is the step up.
Star Brite states UV protection to keep seals pliable, friction reduction so the seal doesn't stick and roll under as the room comes in, and no residue after application. Friction is the part worth understanding. A seal that grabs the sidewall is a seal that gets torn by the room, not one that merely squeaks.
What You'll Love
- Friction reduction, which stops a soft seal rolling under the room
- Enough in the bottle for an RV with three or four slides
- Marine brand with a long record in rubber and vinyl care
- Leaves no residue on the paint below the seal
Worth Considering
- Roughly three times the price of the smaller can
- No straw applicator, so the corners take more effort
- Fewer ratings behind it than the cheaper option
- Still a conditioner, and not a repair for a cracked seal
How Do You Move a Slide Out When the Power Fails?
Find the answer for your own system before you need it, and put the tool it needs in the RV rather than at home.
An in-wall room is the awkward one, because there's no crank. If it won't run, the synchronization routine is the first move, and after that it becomes a service job. A rack and pinion room takes a crank handle from outside the frame, or a socket and ratchet from inside, and the battery must be disconnected first. A hydraulic room takes a hex bit in a cordless drill at the pump. A cable room takes a flexible shaft on the quarter inch hex at the motor.
Two of those need a tool that isn't in most toolboxes. A cheap flexible shaft, or the right hex bit, is worth more in the storage bay than anywhere else.
The other thing worth knowing is the standing instruction in every one of these manuals. Keep hands and body parts clear of the mechanism while the room is moving. Lippert states it directly: "Severe injury or death may result."
What Should You Do Before Storing the RV?
Bring the rooms in, as part of the wider winterizing routine. Lippert recommends the room be closed for long term storage, which protects the seals from sun and keeps water off the top of the room. An RV cover does the same job for the rest of the shell.
Do the seals first, while the rooms are still out and the rubber is reachable. Then bring them in dry. A room retracted wet traps water against the seal and the wall behind it, and that is how a slide out becomes a floor repair. The same water that gets past a tired seal is the water a roof sealant is meant to stop from above. If one of your rooms is already leaking or won't move, our guide to RV slide out repair walks through what to check first.
And once a month through the storage season, run the rooms out and back in. Every electric and hydraulic manual asks for it, and it's the only maintenance instruction in any of them that's unambiguous. Whatever RV slide out types you have, the seals need the same care: keep them clean and treat them with a product the maker approves.
Quick Answers
How many RV slide out types are there?
Four cover almost everything on the road. In-wall, which Lippert calls Schwintek and which shows toothed columns beside the opening. Rack and pinion through the frame, driven by an electric ball screw actuator. Hydraulic, using the same guide arrangement with a cylinder instead. And cable driven, sold by BAL as Accu-Slide, which pulls the room on cables over pulleys.
Should you lubricate an RV slide out?
Not the mechanism. Lippert states in the In-Wall manual that no grease or lubrication is necessary and that in some situations it may be detrimental to the long term dependability of the system, and the electric and hydraulic manuals repeat it. The manuals ask for cleaning with mild soap and water instead. The one exception is the cable system, whose manual says to lubricate the corner pulleys if the room squeaks.
What is the difference between Schwintek and rack and pinion?
Where the work happens. Schwintek is in-wall, with a motor and a vertical toothed column on each side of the opening, so two motors have to stay in step. Rack and pinion runs under the floor on tubes through the frame, with one motor driving a ball screw. Schwintek suits lighter rooms, rack and pinion carries more.
How do you fix a Schwintek slide that is out of sync?
Lippert publishes the routine. Fully extend the room and hold the switch until the motors shut down on their own, retract the room one to two inches, and repeat until both motors stop at the same time. The manual says two or three repetitions are often needed.
What fluid does a hydraulic RV slide out use?
Automatic transmission fluid. Lippert specifies Type A ATF and recommends Dexron III or Mercon 5 or a blend of the two. The standard reservoir holds around two quarts, and on most RVs the same pump also feeds the leveling jacks.
How often should you operate an RV slide out?
Once or twice a month, including through storage. The electric and hydraulic manuals both ask for it in the same words, to keep the seals and internal moving parts lubricated. It's the clearest maintenance instruction in any of them, and it costs nothing.