
A mouse gets into a travel trailer through a hole that’s already there, cut at the factory for a pipe or a wire and never properly closed. So keeping mice out of an RV in winter storage means finding those holes and packing them with steel wool before you park it for the season. Plan on an afternoon under the trailer with a flashlight. No plug-in repeller or scented pouch does it for you. Here’s the order to work in. A winterized trailer is exactly as attractive to a rodent as one that is not, so this is a separate afternoon from the plumbing.
Restful RV is a participant in the Amazon Services LLC Associates Program, an affiliate advertising program designed to provide a means for sites to earn advertising fees by advertising and linking to Amazon.com.
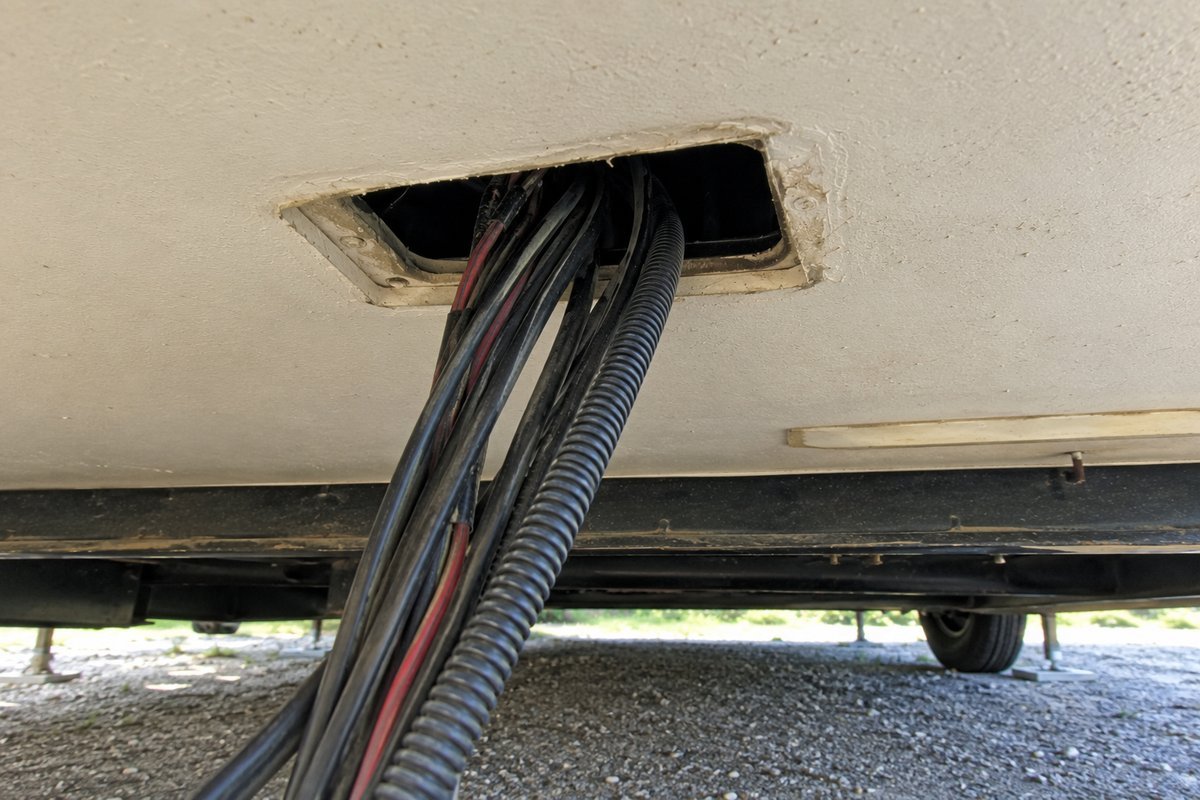
Table of Contents
What you need before you start
- A bright flashlight. A headlamp is better, because you’ll want both hands free.
- A mechanic’s creeper, the low wheeled board you lie on to roll under a vehicle, or a flattened cardboard box. You’ll be on your back under the trailer for a while.
- A bag of stainless steel wool, the coarse kind sold for blocking rodent holes. It has poly fiber woven through it so it springs back after you stuff it into a gap, and being stainless, it will not rust and stain the paint. Plain steel wool from the hardware aisle does both. Copper mesh is the other thing people reach for, and it packs down flat and stays there.
- Heavy shears and work gloves. Steel wool will cut you.
- A tube of exterior sealant and a caulk gun.
- A few square feet of quarter-inch hardware cloth, stiff galvanized mesh, sold in rolls at any hardware store, for anything bigger than a golf ball.
- Replacement flying insect screens for the furnace, water heater and fridge vents, but only if yours are torn or missing. They are sold by appliance model, so read the model numbers off the appliances before you order.
- Snap traps and a marker pen.
Budget an afternoon. Doing it properly once beats doing it badly every fall.
Step 1: Park it somewhere that helps
Gravel and concrete are better than grass. Long grass against the tires is a covered walkway to the underside, and a rig parked in it is a rig with a ramp.
Cut back anything touching the trailer, and move the woodpile, the birdseed, and the bag of grass seed away from where it sits. Then leave a gap between the trailer and the fence or the shed wall, so nothing has a sheltered run along one side.
Step 2: The hour underneath, and exactly what to look for
This is the part that does the work. Get under the front and go back methodically rather than poking about.
You are looking for daylight. Anywhere a pipe, wire, or cable passes up through the floor, the hole was cut oversized so the assembly line could get it through, then sometimes foamed and sometimes not. A gap the width of a pencil is a door.
The list, front to back
- The gas line where it leaves the propane locker and runs toward the back.
- The main bundle of wires where it comes up through the floor, usually near the front and often the biggest single hole on the rig.
- Fresh water and drain lines at the kitchen and bathroom, one cluster each.
- The holes the furnace ducts pass through, which are big and often left open.
- Around the black and gray tank fittings, and where the tank straps bolt through.
- The slide mechanism, if you have one. The floor opening there is the largest on any trailer.
- Where the entry steps bolt through, front and rear.
- The underbelly seams, particularly where an earlier repair has left the plastic sheet underneath sagging or torn.
Mark each one you find with a bit of tape as you go, then seal them all in one pass. Trying to seal each as you find it means crawling out for tools eight times.
Step 3: How to seal each kind of gap
Small gaps around a pipe or a cable
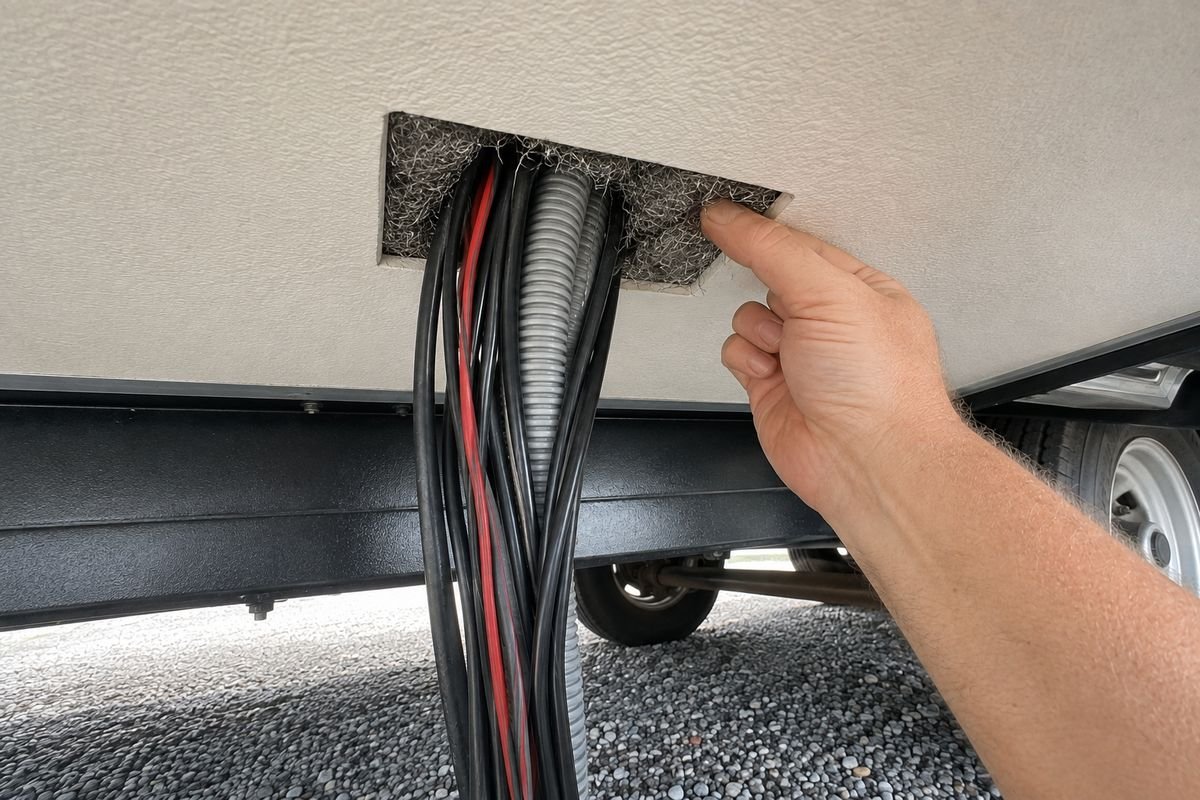
Tear off a piece of the steel wool, push it into the gap with a screwdriver until it is packed tight, and leave it standing a little above the surface. It should spring back when you press it. If it stays squashed, you have used too little.
Do not use expanding foam on its own. Mice chew straight through cured foam; it stops drafts, not animals. Foam on top of packed steel wool is fine.
Holes bigger than a golf ball
Steel wool on its own will sag out of a hole this size, so it needs backing. Cut a piece of quarter-inch hardware cloth about two inches wider than the hole on every side, so it lands on solid floor all the way around, and screw or staple it down flat. Then pack steel wool into the space between the mesh and the edge of the hole. The mesh stops anything pushing through the middle, and the steel wool closes the thin gap around the rim, which is the part the mesh never quite covers.
The underbelly
The underbelly is the black corrugated plastic sheet that closes in the bottom of the trailer, and it tears easily. A tear is an open door, because it lets a mouse into the whole cavity above it, where the insulation and the wiring are. Cut a patch from the same plastic, big enough to overlap the tear by a couple of inches on every side, and seal the edges down with exterior sealant. Do not use tape. Tape lets go in the first hard frost, and you will not find out until spring.
Why not steel wool or copper
Plain steel wool rusts. On a trailer that sits damp for five months it will stain what it is touching and crumble into nothing. Copper does not rust but it compresses and stays compressed, so it loosens over a winter. The stainless wool blend does neither, it springs back and holds.
Step 4: The propane locker and the storage bays
The propane locker vents outside by design, so you cannot seal it. What you can do is check the wall between the locker and the inside of the trailer. On many trailers that wall is thin plywood with a cable passing through it, and that hole is the one worth sealing.
Empty every storage bay completely. Then look at the bay from inside with the door shut and the flashlight on, and see where light comes through. Those are your gaps, and on most trailers there are two or three.
Step 5: Strip the inside
Take everything edible out of the RV, and the list runs longer than most people expect. Pasta, rice, flour and sugar are the obvious ones. The ones people leave behind are dog biscuits, birdseed in a storage bay, bar soap and candles, and a mouse will work on all four, because soap and candles are made of fat and the rest is grain. Packaging is not protection either. A cardboard box or a plastic bag is no barrier at all to an animal that chews for a living.
Then take out the soft things, because they are not food but they are the reason to move in. Bedding, towels, cushions, paper towels, spare clothes, the box of tissues in the cabinet. If a mouse can build with it, it is an invitation.
- Fridge emptied, defrosted, door propped open.
- Every cabinet and drawer left open and empty.
- Closet and under-bed lockers emptied and left ajar.
- Nothing soft left anywhere, or sealed into clip-lid bins if it has to stay.
- Crumbs out of the dinette seams, a vacuum crevice tool, five minutes.
Leaving the cabinets open does nothing for mice, but it does a great deal for damp, which is the other thing that ruins a stored trailer. The dehumidifier guide covers that half.
Step 6: Screen the vents you cannot seal
The furnace exhaust, the water heater vent, the fridge vent and the plumbing vent all have to stay open. They should each have a screen, and on a trailer more than a few years old at least one of them usually does not any more.
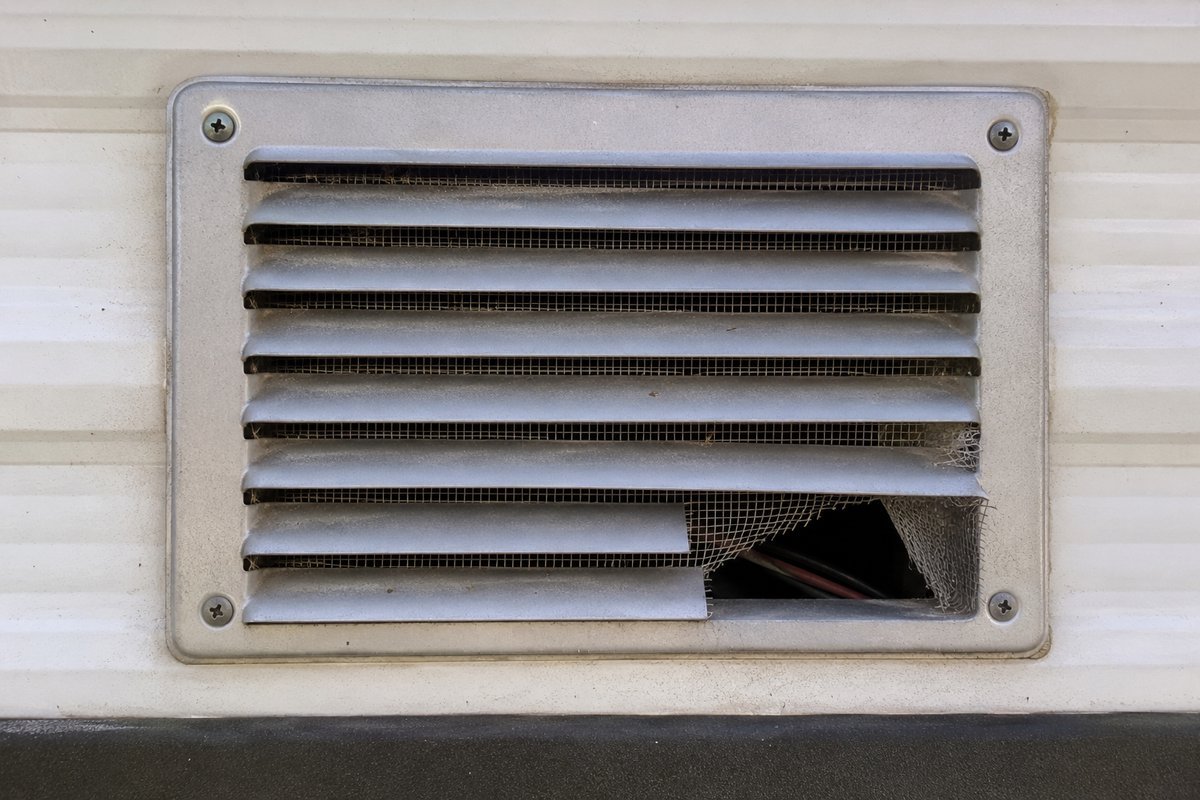
Check each vent from outside the RV with the flashlight. The furnace, the water heater and the fridge are all combustion appliances, which means they burn propane and push the exhaust out through those vents. If one of those screens is torn or missing, replace it. Do not patch it, and do not cut your own. Anything you screw over a combustion vent changes how the appliance breathes. Flying insect screens are sold by appliance model and fit the factory housing, and that is the part to buy.
Never put fine insect mesh or window screen over a furnace, water heater or fridge vent. It loads up with soot, chokes the exhaust and leaves the appliance sooting or shutting itself down. That is a carbon monoxide problem, and it is a worse one than mice.
Quarter-inch hardware cloth is the right answer for the openings where nothing burns, like the plumbing vent and an open storage bay. Cut it to the opening and fix it with stainless screws.
Step 7: Set traps, and write down where
Something gets in eventually. Traps are how you find out in November rather than in April.
Set them along walls, not in open floor. Mice travel with a shoulder against something and will walk past a trap in the middle of a room all winter. Under the dinette, behind the fridge, in the closet, one in each storage bay.
Bait with peanut butter, a smear rather than a blob, and set the trigger light. Then write the locations on a piece of paper and tape it inside a cabinet door. In five months you will not remember, and finding a sprung trap by smell in spring is a bad afternoon.
About the pouches and the plug-ins
Scent pouches are worth having as a top-up, not as the plan. If you use them, use one that is actually EPA-registered rather than one sold under the minimum-risk exemption. The registered ones carry a number on the box and a label with a dose on it.
One practical catch worth knowing. Fresh Cab, the common registered option, states on its own EPA label that it works for up to 30 days, and in another line suggests four pouches per storage unit per season. A season is five months. Take the thirty-day figure as the real one: if you are relying on scent, you are committing to going back and replacing them through the winter.
Plug-in ultrasonic repellers are the best-selling thing in this aisle and they are not part of this method. In 2001 the FTC wrote to more than sixty makers and retailers telling them to make sure they had competent and reliable scientific evidence for their claims, and because a device is not a pesticide, nobody ever reviews whether one works. If you already have one, it is doing no harm. Just do not let it replace the afternoon underneath.
Step 8: Check it once mid-winter
One visit around January, twenty minutes. Look for droppings along the wall edges, check each trap, and put your head into the storage bays with the flashlight. Everything that becomes expensive starts small and quiet.
In spring, before you use it
Before you plug anything in or turn on the pump, look for the three signs: droppings along a wall edge, shredded paper or insulation in a corner, and a smell that does not clear with the windows open.
Then check the wiring. Mice chew the soft insulation off the wiring harness, and the damage shows up months later as something electrical behaving oddly. It is the expensive failure and it is the one you can catch by looking now.
Worth doing before you need it: ask your own insurer how they treat rodent damage. Some policies cover it as sudden and accidental, some exclude it as gradual damage or vermin, and the wording differs between companies in a way that only becomes obvious at claim time.
The short version
- Park on gravel, away from grass, wood and seed.
- An afternoon under the rig with a flashlight, marking every hole.
- Steel wool packed into every gap; hardware cloth over anything large.
- Every scrap of food and every soft thing out of the trailer.
- Screens checked on all four vents.
- Traps along the walls, locations written down.
- One check in January.
That is the whole method. Nothing on the list costs much, and the part that does the work is the part nobody sells you.
What to buy
Short list. Most of it is cheap, and you will use the leftovers next year.
The two that do the actual work
Xcluder rodent control fill fabric: a roll of coarse stainless steel wool blended with poly fibers, sold in a 4-inch by 10-foot roll. Ten feet covers the small gaps around pipes and cables on a typical trailer with some left over, and the leftovers keep. Buy this rather than plain steel wool, which rusts and stains, or copper mesh, which stays squashed once you compress it.
Quarter-inch hardware cloth: stiff galvanized mesh, sold in rolls. Buy one at least 8 inches wide. A patch has to overlap the hole by two inches on every side, and a narrow 4-inch strip cannot do that however long the roll is. Quarter-inch is the size that matters. Half-inch is cheaper and far more common, and young mice go straight through it. This is for holes bigger than a golf ball, and not for appliance vents.
Worth having
Victor Metal Pedal snap traps: the plain wooden ones, sold in a 12-pack. That covers every storage bay with enough left for the inside, and it is cheap enough that you will not ration them. Set them along walls rather than out in the open, with a smear of peanut butter, and set the trigger light.
Victor electronic mouse trap, M250BSR: a battery trap sold in a 2-pack, with a green light on top that tells you it has caught something so you can empty it without looking inside. Worth it if dealing with a snap trap in spring is the thing that stops you setting any at all. One or two, where you will actually check them.
Fresh Cab botanical rodent repellent: scent pouches, sold in a box of 12, and EPA registered as 82016-1, which is printed on the carton. This is a top-up, not a plan. Work out the quantity from the label rather than from the box. It says four pouches per storage unit per season and it also says effective up to 30 days, so a box of 12 is three changes of four. That is three months, and a storage season is five.
Sterilite Ultra Latching boxes, 70 quart: sold in a 4-pack, with latches on both sides rather than a lid that only sits on top. A loose lid is not a barrier, because a mouse needs one corner lifted a quarter of an inch. Seventy quarts holds a full set of bedding. The clear sides are worth more than they sound, because in April you can see what you left in there without opening anything. Measure the height of wherever it is going to live before you order, since a tall box will not slide under a bed.
Skip
Ultrasonic plug-in repellers: the best-selling thing in this aisle. No part of this method depends on one, and nothing reviews whether they work. If you already own one it does no harm. It just is not a substitute for the afternoon underneath.
Expanding foam on its own: fine for drafts. Mice chew straight through cured foam. Use it over packed steel wool if you like the finish, never instead of it.
None of that is a big spend, and the two items at the top decide whether any of the rest matters.
Keeping mice out of an RV in winter storage is a sealing job first and a trapping job second, and the order matters more than the products do.
Related guides
- RV Storage & Security: The Complete Guide. Everything that goes wrong while a trailer sits.
- 5 Best RV Dehumidifiers for Winter Storage. The damp half of the same job.
- 5 Best Battery Maintainers for RVs in Winter Storage. The other thing most likely to fail over a winter.
- 5 Best Smart Temperature Sensors for RVs in Storage. For knowing what is happening in there without driving over.
Nearly all the work that keeps mice out of an RV in winter storage happens before the door is locked in November, not after.
How To: Winterizing Summary
How to keep mice out of an RV in winter storage.
Step 1: Park it somewhere that helps
Gravel and concrete are better than grass. Long grass against the tires is a covered walkway to the underside, and a rig parked in it is a rig with a ramp.
Step 2: The hour underneath, and exactly what to look for
This is the part that does the work. Get under the front and go back methodically rather than poking about.
Step 3: How to seal each kind of gap
Tear off a piece of the steel wool, push it into the gap with a screwdriver until it is packed tight, and leave it standing a little above the surface. It should spring back when you press it.
Step 4: The propane locker and the storage bays
The propane locker vents outside by design, so you cannot seal it. What you can do is check the wall between the locker and the inside of the trailer.
Step 5: Strip the inside
Take everything edible out of the RV, and the list runs longer than most people expect. Pasta, rice, flour and sugar are the obvious ones.
Step 6: Screen the vents you cannot seal
The furnace exhaust, the water heater vent, the fridge vent and the plumbing vent all have to stay open. They should each have a screen, and on a trailer more than a few years old at least one of them usually does not any more.
Step 7: Set traps, and write down where
Something gets in eventually. Traps are how you find out in November rather than in April.
Step 8: Check it once mid-winter
One visit around January, twenty minutes. Look for droppings along the wall edges, check each trap, and put your head into the storage bays with the flashlight.